Already Bought Before (ABB)
A WooCommerce Plugin - Version 1.4
- created: 03/10/2011
- latest update: 01/14/2017
- by: hupe-graphics
- Plugin-Page: www.hupe-graphics.de/hg-abb.html
- Support: www.hupe-graphics.de/helpdesk
- email: support@hupe-graphics.de
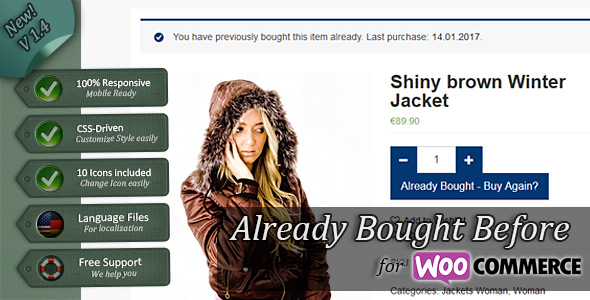
Already Bought Before (ABB) displays a message if the user has already purchased the product he's currently viewing. The date of the last purchase will also be displayed and the text of the Add-to-Cart Button changes depending on whether the product has already been purchased or is currently in cart. Thank you for purchasing my plugin. If you have any questions that are beyond the scope of this documentation file, please feel free to email via my user page contact form here. Thanks so much!
Description and Features
The Plugin Already Bought Before (ABB) for WooCommerce checks if the currently logged in User has already bought the product he is viewing at the moment (when he's on a single Product Page).
If yes, it will display a Message for him to draw his attention on this fact. The date of his last purchase of the current item will also be displayed and the date is linked to the matching order. For sure your user still can purchase the item again!
The Message is shown above the Product (where normally Add-to-Cart-Message is shown also).
Since Version 1.4 you can choose the format of the purchase date. Also since Version 1.4 the "Add to Cart"-Button changes the text if the current product has already been purchased by the user.
Since Version 1.1 the message displays the date of the last purchase of the item. The date ist linked to the matching order ( the last order which includes the item the user is currently viewing). Also since Version 1.1 the "Add to Cart"-Button changes the text if the current product is already in the users cart.
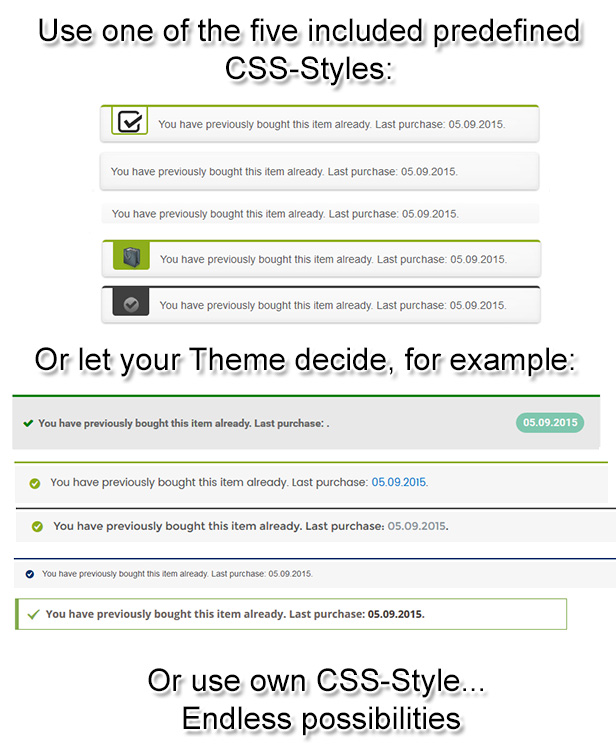
You can change the Style of the message. Choose between 5 predefined CSS-Styles, let your Theme you use make the job via default CSS or upload and activate your own CSS-File! All this easy from the Admin-Backend!
You can choose the Icon you like. 10 different Icons royalty free to use by you are included. You may also upload your own or don't use any Icon. Just as you need it.
Easy to Configure via Settings Page
Message-Text, Style, used Icons, Button Text. All this you can change easily from your Wordpress Backend!
Use the Message Text you like!
No matert whatever you want to be displayed to the customer: Simply add your text in Settings and it will be delivered! No need of touching a language file or hardcode the text. Easy!
CSS Files Driven
The Style of the Message is completely driven by a CSS-File. So you can simply change it on the settings page to your needs. The Plugin comes with 5 different, predefined Styles ready to use. Or let the Style of Messages defined by the Theme you use do the job. Just as you want!
Icons included
The Main Style uses PNG-Icons to make the Message more visible. You can simply Change the Icon on the settings page. Every 32x32Px PNG-Image should work. But we have also included 10 different Icons royalty free to use by you. Simply choose the one you like with one click!

Language Files included (only needed for Backend-Settings)!
Already included languages are: German (de_DE) and American English (en_US).
With the Plugins comes a default *.POT-File also. So you can simply make your own translation for the settings page in the backend.
Installation
Via Admin-Dashboard
To install WooCommerce Already Bought Before (ABB) via the Admin-Dashboard you have to:
-
Make sure you have WordPress
4.7+ and WooCommerce 2.6+ installed (not tested with minor Versions but it may work).
-
WooCommerce does not have to be active during installation but this plugin won't do anything without WooCommerce being active
-
Download the plugin from CodeCanyon
-
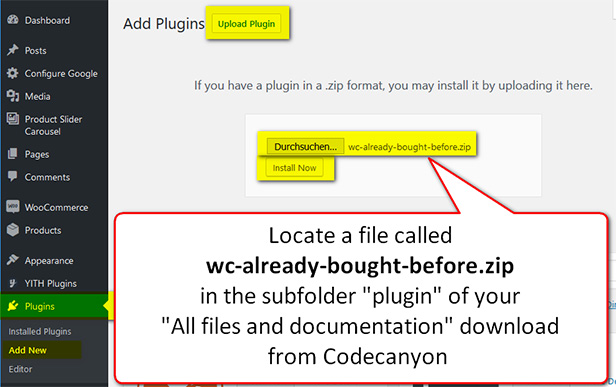
Unzip the downloaded file and locate a file called wc-already-bought-before.zip under Plugin
-
Log in to your WordPress administrator zone
-
Go to Plugins | Add New | Upload:
-
Upload file wc-already-bought-before.zip
-
Activate the uploaded plugin. You don't have to do more, it works from now on with default settings! BUT:
You can do more if you want to.
Have a look at the Quick Start Guide.
Via FTP
In case you want to upload via FTP:
-
Download the plugin from CodeCanyon
-
Extract the archive
-
Locate a folder called wc-already-bought-before under
plugin
-
Upload this folder to wp-content/plugins
- In administrator zone, go to Plugins and activate this plugin
Quick Start Guide
How to start
After successfull Installation and Activativation the plugin already works and shows the message with the default Style, Icon an Message.
If you want to customize the look, you can do this in backend via settings page.
After changing some options don't forget to save the new settings by hitting the "Save changes" button.

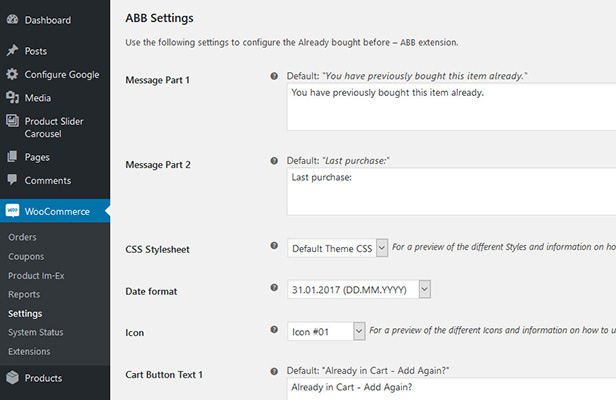
Where can I find the settings?
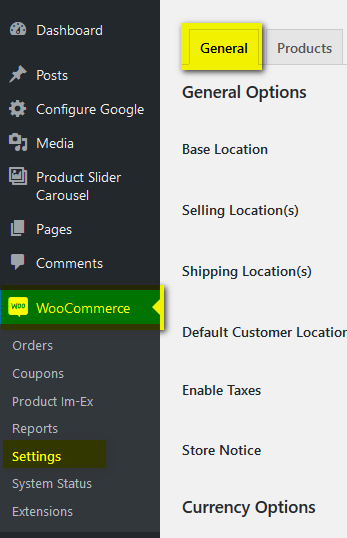
To access and change the settings you have to be logged-in to your Wordpress installation with admin rights. Please navigate to:
WooCommerce | Settings | General
You have to Scroll down a little bit, ABB-Settings are near to the end of the General-Tab.
In following read how to change settings.
Change the text of the message, the Add to Cart Button and the format of the Date
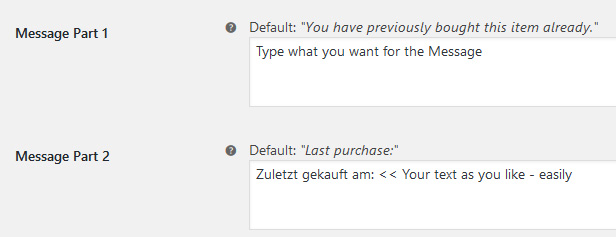
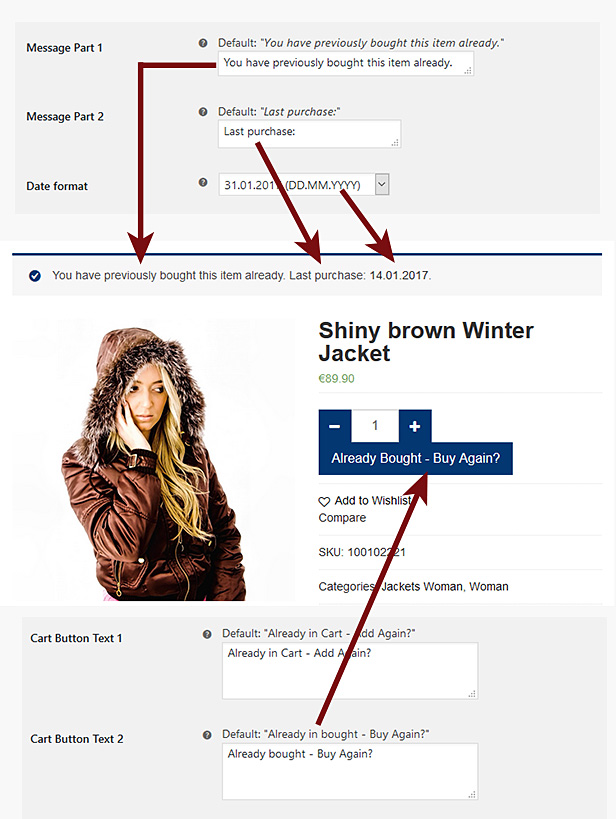
The message shown to the user on single product page consists of two parts. You can edit them seperatly. The first sentence is to tell the user that he already purchased the product. The second sentence ist the part directly before the date of his last purchase of the item is displayed. When done hit "Save Changes".
Another thing you may change is the text that is placed on the Add to Cart Butten when the user is on a single product page and the product has already been purchased by him or he has the product he's currently viewing already in his current cart.
If the product has already been purchased by him AND he has it in his current cart, the "Already in Cart" Mmessage will be shown instead of the "Already bought".
To change the default text add the text you want in the
Change the Style
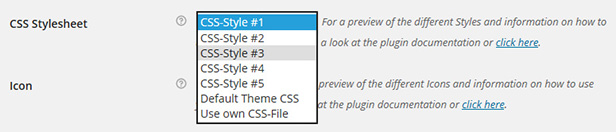
The style of the message is powered by CSS. To change it you can choose from 5 predefined Styles, let the message style like every other message in your theme (e.g. the successfull added to cart message) or upload and use your own CSS File:
In seetings choose the Style you want from the Dropdown. Have a look here (click) to see which Style-Number causes which look.
When done hit "Save Changes".
To use your own Style you need a CSS-File. You may open one of the included files and change to code so it fits to your need.
When you have a CSS-File which you want to use you have to save it with the name hg-abb.css an upload it via FTP to your Wordpress Installation. The File has to be placed in the subfolder \wp-content\plugins\wc-already-bought-before\css\ (there are the other CSS-files, too).
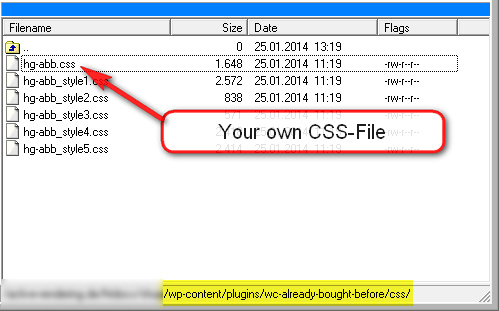
When done you have to choose "Use own CSS-File" from the dropdown on Settings page. Don't forget to save the changes.
Change the Icon
The Icon that is displayed before the message text is a PNG Image file. All 10 predefined Icons you have with this plugin have the dimensons 32x32 Pixel. Because of that they work fine together with the predefined CSS-Styles. If you only want change the Icon using one of the delivered set, simply choose the Icon-Number from the dropdown on settings page:
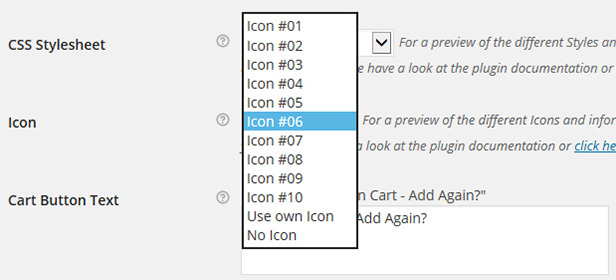
Have a look here (click) to see which Style-Number causes which look. You may also choose "No Icon" if you don't want an Icon be displayed.
To use your own Icon you need a PNG-Image-File. It should not be bigger than 32x32 Pixels!
When you have an Image you would like to use save it with the name hg_abb.png an upload it via FTP to your Wordpress Installation. The File has to be placed in the subfolder \wp-content\plugins\wc-already-bought-before\images\ (there are the other PNG-files, too).
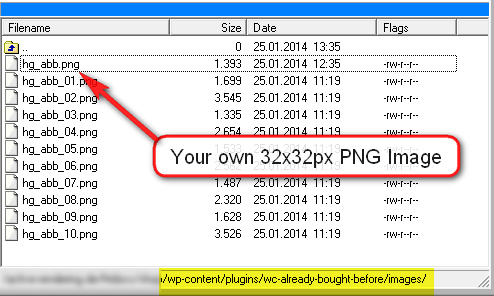
When done you have to choose "Use own Icon" from the dropdown on Settings page. Don't forget to save the changes.
CSS-Styles
Five different Styles are already included. Here's an overview which CSS-File-Setting in the Options causes which Style:
CSS-Style #1:

CSS-Style #2:

CSS-Style #3:

CSS-Style #4:

CSS-Style #5:

You can change the used Icon Image seperately. Style #2 and Style #3 have no Images integrated. The three other Styles have Icons (the one from Style #1 as default, change it in the settings if you like).
Notice:
You can also use your own CSS-File. For a how to please have a look at the Quick Start Guide.
Icons
Here's an overview which Icon setting on options page calls which Icon:
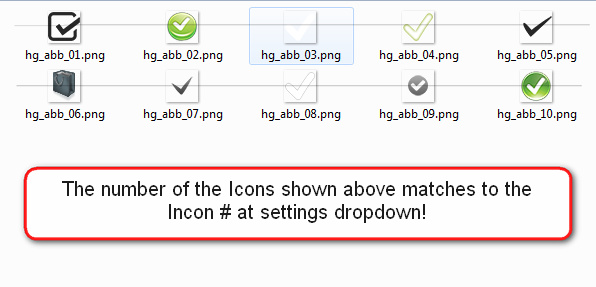
You can use every PNG-File with dimensons 32x32px. Bigger will not fint into the predefined CSS-Styles. For sure with your own CSS-Style you can use every Image. For how to change the Icon see Quick Start Guide.
Support
We will give you free support on this Plugin. Do not hesitate to contact us!
You can also write an E-Mail to support@hupe-graphics.de and we'll be happy to assist you.
Perhaps you may also like to visit our Support-Forum, it's loactet at the 3D-Community 3D-Board: http://www.3d-board.de/216-hupe-graphics-support-forum/
Changelog
V 1.4 (14.01.2017)
* NEW Feature: Add to Cart-Button changes text if product is already bought - text can be defined by admin
* NEW Feature: Change the format of the Date of last purchase in Message
* NEW Frature: Direct link to Settings and Helpdesk from WC Plugin Page
* Improvement: Add full WooCommerce 2.6 and Worpress 4.7 compatibility
* Improvement: Functions only called for logged-in-users
* Improvement: prevent unnecessary CSS loading for better for better performance

V 1.3 (16.02.2014)
* Improved: Add full WooCommerce 2.1.x Compatibility

V 1.2 (10.02.2014)
* Improved: German Translation

V 1.1 (24.01.2014)
* NEW Feature: Show Date of last purchase in Message
* NEW Feature: Date is linked to matching order overview
* NEW Feature: Change the used CSS-File via Admin-Settings
* NEW Feature: Change the used Icon via Admin-Settings
* NEW Feature: Change the Message Text via Admin-Settings
* NEW Feature: Add to Cart-Button changes text if product is already in the cart
* Improved: Quick Start Guide added to Documentation
* Fixed: Some minor code issues

V 1.0 (18.01.2014)
* First stable release
Thank you
Once again, thank you so much for purchasing this plugin.
As I said at the beginning, I'd be glad to help you if you have any questions relating to this plugin.
No guarantees, but I'll do my best to assist.
If you have a more general question relating to the plugins on Codecanyon, you might consider visiting the forums and asking your question in the "Item Discussion" section.
Visit us @ http://www.hupe-graphics.de
Follow us @ 


